Tournament Wizard
The Tournament Wizard guides you through the process of creating or changing
tournament definition.
The tournament definition records specific
information about the tournament and its rules. This definition is stored in
the tournament directory and must be the
same on all computers in the tournament.
Be sure to have the data from your Planning
Worksheet available as you use the Tournament Wizard to define your tournament. You will
implement some of those plans in this process.
If you make a mistake or change your mind, don't worry. You can change
most of the tournament definition at any time. The exception is the choice
of score sheet, which cannot be changed after any score is entered. [If you
must change the score entry
mode, you will have to delete all entered scores first.]
To move back and forth through the Wizard, use the Next and Back
buttons at the bottom of the windows.
Defining a tournament with the Tournament Wizard includes the following items:
| Caution |
| The tournament definition implements policy set by the Tournament
Director, and must be the same on all computers in the tournament.
Consult the Tournament Director or Score Master before changing any
aspect of the tournament definition. |
Start the Tournament Wizard
To start the Tournament Wizard:
Select New or Current (existing) Tournament
On the first page of the Wizard (No, that's not a photo of any DI Scoring Program developer!),
you are presented with 3 options:
- Create a new tournament from DIHQ - This option is the best choice for creating a tournament if
most of the information for
your tournament has already been entered into the DI Resource Area. With this option, information for
your tournament will automatically be imported from the DI Resource Area including the name and date of
your tournament, the teams and their schedule for the tournament, your appraisers and their scoring
assignments, advancement rules, etc. This is the most common choice for most tournaments.
- Create a new tournament manually - This option is the best choice for creating a tournament if
you want more control over the creation and importing of your tournament data. With this option, you'll
be prompted to enter the name and date of the tournament, set reporting options, set up advancement rules,
import teams and their schedules (either from the DI Resource Area or from CSV files on your local computer), etc.
This was previously the only option to create a tournament prior to 2025.
- Modify current tournament - This option allows for the modification of settings for the current
(existing) tournament.
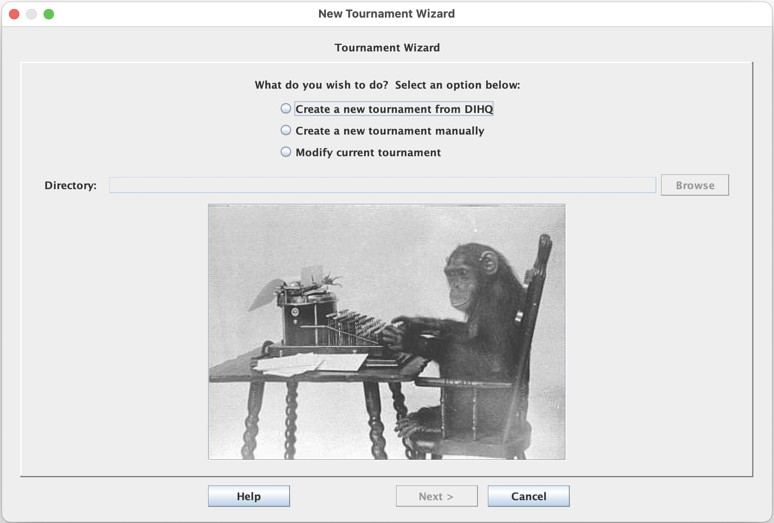
Select one of the option to create a new tournament or to modify the current (existing) tournament.
When creating a new tournament, your first task is to identify (or create) the folder or
directory to contain that tournament data files. After you've selected the folder, the Browse
button will let you return to the list.
When you're finished, click Next.
If you selected the Create a new tournament from DIHQ option, click Finish. You'll then be prompted
for your DI Resource Area username and password and asked to select your tournament. Once completed, the system will
display of log of the import actions performed. Click the Continue button to close the log. The system will
now reload the tournament with the new information and teams that were imported. You may skip the remaining items
on this page since those items were just imported for you. If you need to modify some of the settings for your
tournament, you should start the Tournament Wizard again and choose Modify current tournament to adjust
those settings.
If you selected the Create a new tournament manually or Modify current tournament, click Next and
follow the instructions below.
Enter the Tournament Information
The Tournament Information page requests the following basic information about the
tournament.
- Tournament Name and Location. Enter the tournament name and the building or city
in which your tournament is being held. The DI Scoring Program prints this information
on the report headings.
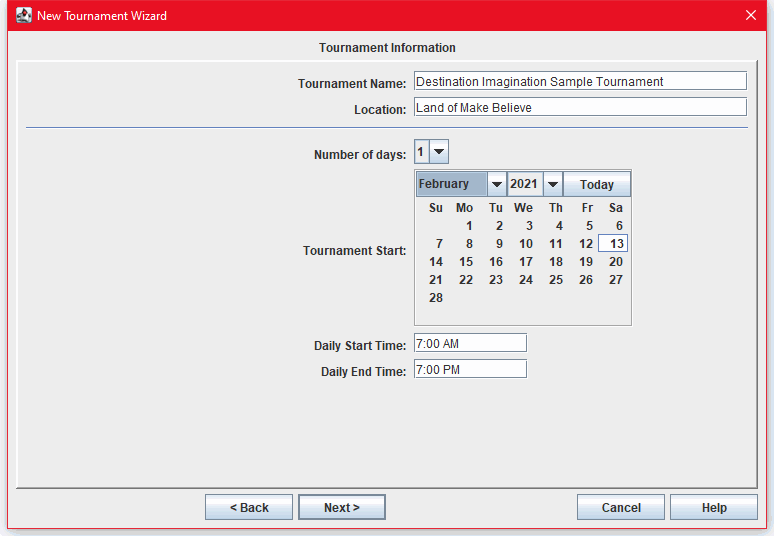
- Set Tournament Date and Time. The DI Scoring Program records the date and
time of the tournament on tournament reports and calculates the time you expect to finish
each day.
It also uses the tournament's "Daily Start Time" to interpret each team's challenge
starting times on a 12-hour clock. If you enter team data using a 12-hour time without
AM or PM, the DI Scoring Program interprets all times earlier (numerically smaller)
than the start time as PM and all times equal to or later (numerically greater) than
the start time as AM.
| Note |
|---|
| The DI Scoring Program does not validate challenge times. |
To set or change the tournament date and time.
- Use the Number of days drop-down list to set the duration of your tournament.
Click the arrow, then select the new value.
- Use the Tournament Start drop-down lists to set the month and year of the
tournament and then, on the calendar, click the day on which the tournament begins.
- In the Daily Start Time box, type the time of day the tournament begins in
12-hour (AM|PM) time format, such as 7:30 AM. If the tournament extends over several days,
type the earliest day's starting time.
- In the Daily End Time box, type the time of day the tournament ends in 12-hour
(AM|PM) time format, such as 10:45 PM. If the tournament extends over several days, type
the latest day's ending time.
Set Challenge Colors
The DI Scoring Program lets you color code the non-score items in the
Tournament Summary Window, the
All Teams Window, the
challenge level windows, and the score sheets. You
can select a different color scheme for each challenge in the tournament. The colors
make it easier to identify a team or a score sheet window as belonging to a particular
challenge.
The color choice is included in the tournament
definition to make it easy to set the colors the same on all computers in
the tournament.
Most users find the color coding to be a useful aid, but you can use the
Turn colors on and off preference to turn the
colors off if you find them annoying. The default preference is actually to
not use challenge colors.
| Note |
| Issues are tracked by
displaying the team's row in white text on a red background in the
Tournament
Summary Window, the All Teams Window,
and the team's challenge level window. The
selected item in any of these windows is identified by the use of black text on
a light blue background. Avoid assigning either of these color combinations to
a challenge. |
| Tip! |
| Set the colors for each challenge to match the color of paper forms
and folders used to represent the challenge at your tournament. |
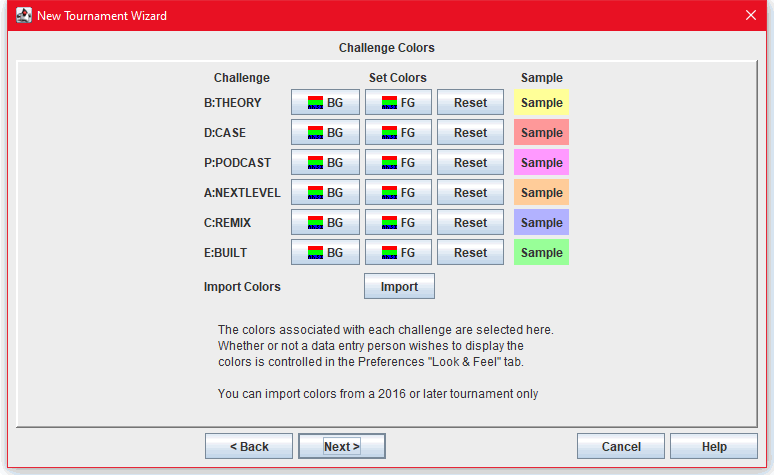
To set or change challenge colors:
-
Choose one of the following:
- To change the background color of the score sheet for a
challenge, click the BG button in the challenge row.
- To change the color of the text (foreground) in the score sheet
for a challenge, click the FG button in the challenge
row.
- To select a preset color, click the Swatches tab. Then, click
a color swatch in the main box or in the Recent box to select
it.
- To specify a different color, click the RGB tab. Then, drag
the slider guides or type a value in the text box to specify the amount
of red, green, and blue in the color.
-
Use the HSB tab to adjust the hue, saturation, and brightness of
the color. To adjust each element, click the circle button beside the
element, and then drag the slider guide or type a value for the element
in the associated text box.
The tab also displays the current RGB values for your
reference. To change these values, return to the Swatches or
RGB tab.
- To restore the colors to the default scheme (black on gray), click
OK to return to the Colors tab, and then click the
Reset button for each challenge.
To Import (copy) challenge colors from an existing tournament:
If you have another tournament for which you've already set your challenge
colors, click on the Import button, then select the name of the
tournament (directory) whose challenge colors you want to copy. Remember
that challenge colors are part of the tournament definition, not a preference - your
preference is only whether to use these challenge colors or not.
When you're finished, click Next.
Set the Tournament Results (Web) Page
In this task, you specify the optional characteristics of the Tournament
Results Web page.
The DI Scoring Program Web Page feature creates a fully formatted,
ready-to-use Web page (in HTML format) displaying the results of the tournament. You can
post the Web page on your regional Web site within minutes of the
conclusion of the tournament, and distribute it in e-mail to the media or
anxious grandparents.
This task implements the decision made in the Design a Scoring Room Public Policy planning task. These
options should be set in accordance with the scoring room public relations
policy and in consultation with the Tournament Director. (See Design a scoring room public relations policy.)
To produce the Web Page, in the Tournament
Summary Window, from the File menu, select Generate HTML Results,
or press Ctrl+G.
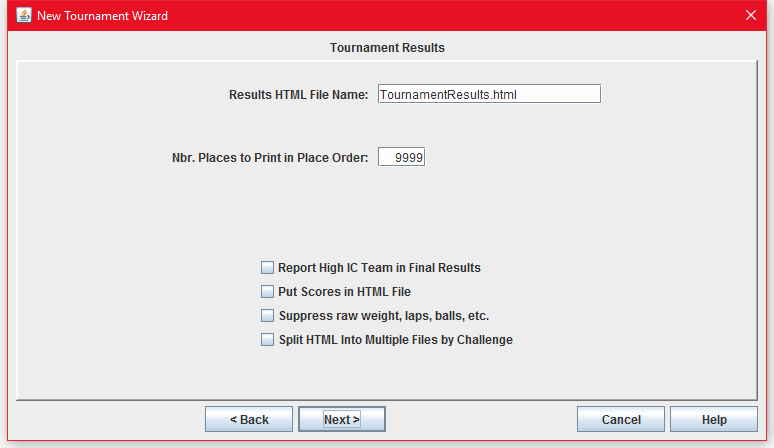
To set up the Web Page:
-
In the Results HTML File Name box, type a name for the Web Page
file. Or, leave the preset name, TournamentResults.html.
When you produce the Web Page, the DI Scoring Program saves
it in the tournament directory in a file
with the name you select.
-
In the Nbr. Places to Print in Place Order box, type the number
of teams that are printed in the order of their winning scores. The
remainder of the teams are listed in alphabetical order.
| Note |
| This setting affects the Meet Summary Report (See the Report Reference Table) and the
Tournament Results Web Page. |
Typically, in consideration of those who might fall at the bottom of
the list, only 3 to 6 teams are listed in rank order. Default value of "9999"
is a way of saying ALL - hope your tournament doesn't actually have that many teams!
-
In the Report High IC Team in Final Results field, check the box to include
the Team with the Highest IC score for each Challenge and Level. High IC Team will be
listed immediately after the 1st place teams in reports and html files for the Web page.
-
In the Put Scores in HTML file field, check the box to include
scores in the Web page.
Many regions consider their scores to be private and omit them from
public documents.
- If you choose to put scores in the HTML file, then in the Suppress raw weight, laps, balls, etc. field, check the box
to suppress these raw score elements if they might create controversy or
ill feelings in your constituency. The scaled scores associated with these
scoring elements will still be included.
- The final option on this Info Results screen allows you to check the box to
Split HTML into
Multiple Files by Challenge to possibly simplify printing these documents,
especially if you want them as separate HTML files to meet your Web Page needs.
Identify the Competition Levels
Here you tell the DI Scoring Program which challenge levels or competition levels are represented in your
tournament. The DI Scoring Program uses this information to
configure the tournament and challenge level windows.
You can also use this procedure to add or remove
challenge levels from a tournament. This might be necessary if a team moves
to a challenge or challenge level not previous represented in the
tournament.
To determine the challenge levels represented in your tournament,
examine the team data for the tournament or consult your tournament
director.
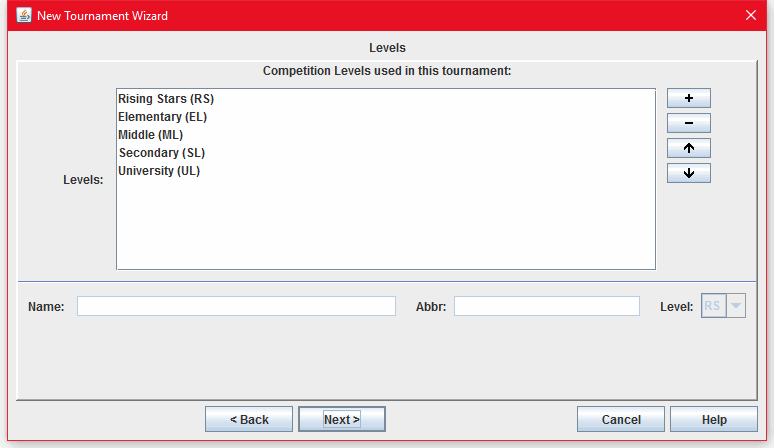
To set challenge levels:
-
To delete a listed challenge level, highlight that name and click
on the minus sign.
-
To change the name of a listed challenge level, highlight that name and
type the new name and abbreviation in the blanks below the table.
-
To add an additional challenge level, click on the plus sign and
type the new name and abbreviation in the blanks below the table.
| Note: |
| You do not need to add the word "Level" to your new Challenge Level name - the
Wizard will do that for you! |
| After you've added a new Level name, pay close attention to the Abbr: that's
been created for you. The Program may be more helpful than you expect! |
If you will have more than one site (separate competitions) for a single Challenge Level,
here's a place where you can define the additional names you'll use, like "Elementary-A" or
"Middle Blue." See More than one Site for a Challenge Level
for a more thorough description of the process if you are in this situation!
Set Advancement Rules
In this task, you tell the DI Scoring Program how many teams
advance to the next level of competition based on the number of teams
competing in each challenge or level.
Advancement rules may be set by level, by challenge, or for each
challenge and level.
For this task, you will need the Advancement Rule Table that you completed in
the Determine rules for advancement planning
task.
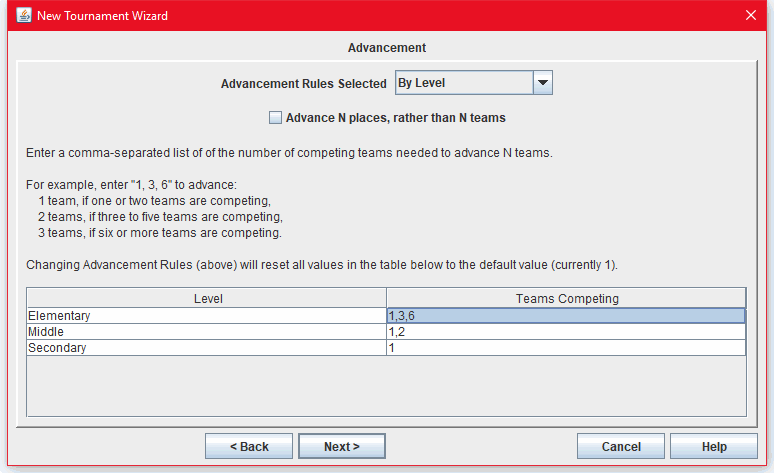
To Interpret Advancement Rules
Each row in the table represents the advancement rule for the
indicated level and/or challenge.
To define a rule, think of it this way.
For each number of teams competing, a certain number should advance.
Here we define the smallest number of teams competing in a challenge and level for which each
step increase occurs in the number who should advance. Consider this example from one affiliate:
| When at least this many teams compete, |
this number should go on. |
| 1 |
1 |
| 3 |
2 |
| 6 |
3 |
To express this example rule in the language of the Wizard's Advancement table, you would type:
1,3,6
In other words, just type the number of teams at which you increment the number advancing -
separating these values with commas.
The Secondary line of this table represents the mandated and fundamental Destination
Imagination advancement rule: "If even one team competes in a challenge level, then one
team advances to the next level of competition." This is expressed by the Wizard default:
1
To Advance N Places or N Teams
You can select (for the entire tournament) whether N teams or N places advance to
the next level of competition, where N represents any of the values you have established above.
If you advance N teams, ties may add to that number. If you advance N places, ties
may exist in each and every one of those places, further increasing the number of
teams advancing. For an explanation of what constitutes a tie in DI scoring, see
"When are teams tied?"
If this seems confusing, consider this situation. Three teams are tied for first place, two
more are tied for second, and two more are tied for third. If you advance three places, all seven
of these teams would advance. If you advance three teams, even "plus ties," only the three teams
tied for first place would advance. None of those second place teams is actually tied with the
"third" first place team!
The default selection is for N Teams to advance, where N is defined by the
advancement rules. Check the box if you want to advance N places instead.
If your tournament has more levels than are listed
If your tournament has more levels than are listed with advancement rules, just go back
through the Tournament Wizard again and you should see the existing additional level(s).
The Wizard builds this table of rules based on levels that already exist in your tournament.
If it's your first time through the Wizard, you'll see all five possible levels listed -
RS, EL, ML, SL and UL.
Load the Team Data
Import Teams from File
In this task, you may add your teams to your tournament by importing them from
a comma-separated (CSV) text file. If you're modifying the current tournament, you
may choose to keep the existing teams.
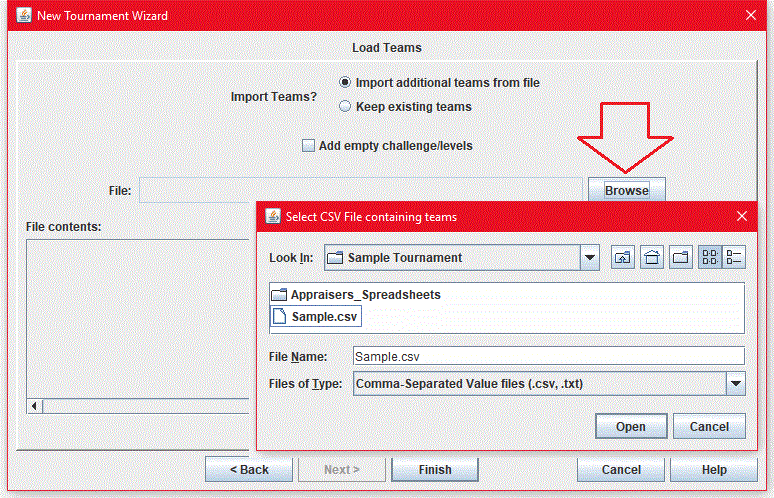
You can use the Load Team feature to add all of your teams to the
tournament, or to add to the teams that you typed in or loaded from another
team data file. And, you can always come back to this feature to load more
teams. The DI Scoring Program always adds teams to the tournament; it
never overwrites or replaces existing teams.
Before you load teams, verify that your data file is formatted correctly for the DI
Scoring Program. (See Prepare the Team
Data.)
To load teams from a CSV file:
In the Select CSV file containing teams window, locate your file, or type
the full path to the file in the File name text box, and then
click Open.
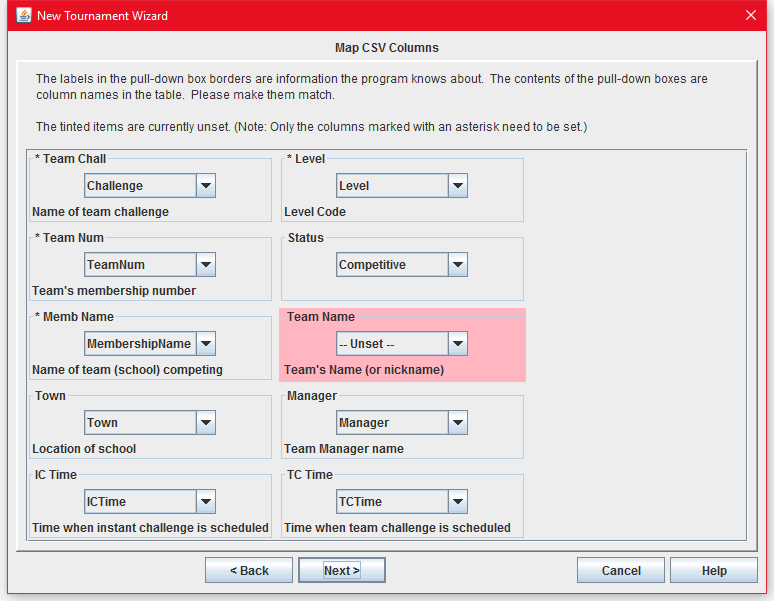
First, you'll have an opportunity to map the column titles in your CSV file to those used in
the DI Scoring Program. In the image above, you see the "MembershipName" column heading
from your CSV file being mapped to the "Memb Name" label that the program understands.
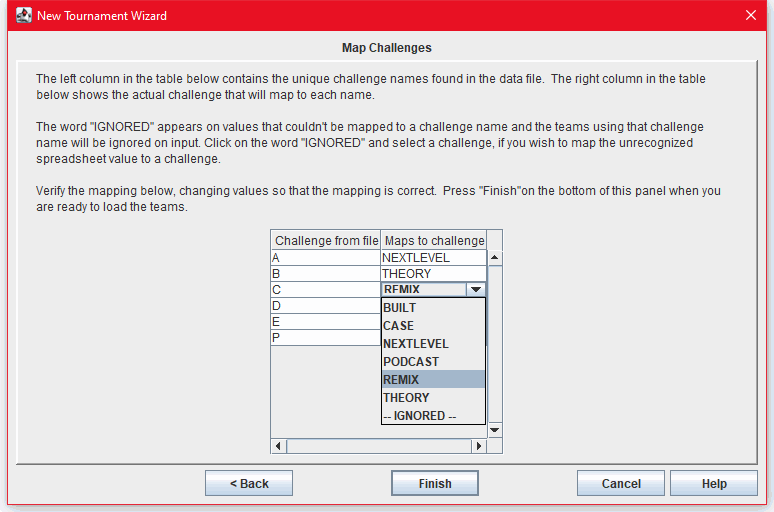
Then, you'll have a chance to map the Challenge names in your CSV file to the standard
short names used by the program. You see in the third line of the example "Operation" from
your file mapped to "Cooperation" in the program. And yes, CASE is important in this operation! If your CSV
file has some inconsistencies, just map both "OPERATION" and "Operation" to "Cooperation" with two separate lines
in this table.
Create Empty Tournament
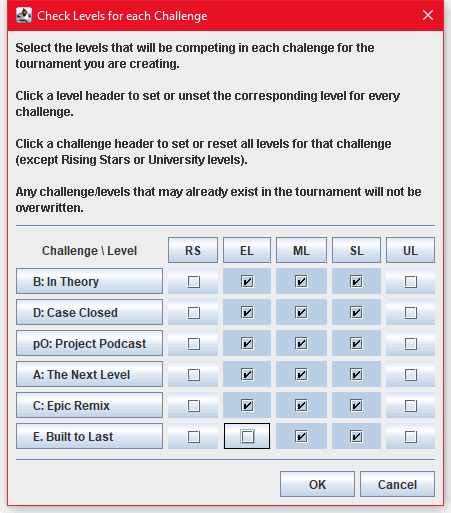
While creating the empty tournament, you have the opportunity to have the Wizard create
"empty" Challenges and Levels that you select with these check boxes. BEWARE the "CANCEL" button
at the bottom of this window - it "cancels" the ENTIRE Wizard and CANCELS the creation of
your new tournament! [Oops, back to square one!]
Then Finish.
The DI Scoring Program displays a message that tells how many
teams were loaded. Then the Continue button closes and reopens
your tournament, which now contains all of the newly-loaded teams.


